

First, thanks for Josh at ECS for helping me with the parts. He saved my bacon a bit by getting a new "water shield." There is no way to get that thing off without ripping it, thin foam with SUPER sticky stuff holding it to the car.
First: http://www.maseratilife.com/forums/quattroporte/15889-diy-how-remove-front.html
Read that. The door panel is very easy to remove, just follow the instructions.
After that you will need to disconnect the door pull, and a number of electrical connectors. They are a mix of fold over and press release connectors. The one near the front actually stays together, chase the wires to where they connect to the door. You will find a few velcro strips holding wires down. Unplug from the door itself.
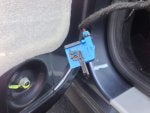
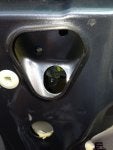
First picture is the water shield. The white thing...
![]()
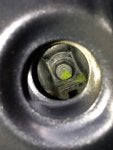
Next is the attachment for the door latch. Don't forget to put this back in the connector when you put the door back together... Not that I did that or anything.
![]()
Here is one of the couple slide connectors. These have a lever on the top with a stop. Push the stop in and slide the lever, the connector comes apart very easy. The other connectors are standard pressure connectors with a small latch. Make sure that when you put it all back together that the stop is in.
![]()
Sticky stuff. Get it ALL off. Takes a while but it will come off
![]()
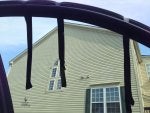
Tape your window up. It *WILL* fall if you don't. (and probably shatter)
![]()
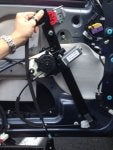
Here is the right hand side of the regulator. The old one is underneath in the door. Just to give you an idea of how it sits in the car. Notice that the motor has a bolt on it (rubber mount).
![]()
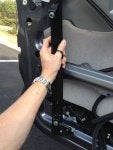
Here is the left side.
![]()
This is the left side window bolt. This needs a 10mm wiggle socket as it is at a slight angle.
![]()
Right hand side, nothing special. Just a 10mm bolt.
![]()
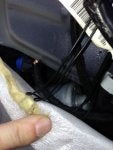
Here is the connector for the motor. It is just behind this portion of an interior water shield. Disconnect without removing the shield, just be careful.
So as for instructions, it is a straight forward job. There are 7 bolts/nuts to undo. Two on the left support, One on the left window connector. Then two on the right support, one on the motor and one on the right window connector. Undo all of them and your window should stay exactly where it was if you did everything right.
The regulator will come out of the bottom hole, just give it a few minutes of fiddling. Be VERY careful about the interior water shield. You can do this without damaging it.
Then slide the new regulator up and in. All of it goes in, the left hand side has two bolts on the unit right out of the box. Leave them on. Push it up and into the openings and back down (it will be obvious when you see it.) Then do the same on the right side. Make sure the galvanized metal window connectors are on the inside of the window connectors. Bolt it all down and viola. Done.
It is VERY fiddly to get it in, but it does work.
Then put everything else back together, though I would plug the two middle connectors into the door panel and turn on the car to make sure all of the electronics are working.
First: http://www.maseratilife.com/forums/quattroporte/15889-diy-how-remove-front.html
Read that. The door panel is very easy to remove, just follow the instructions.
After that you will need to disconnect the door pull, and a number of electrical connectors. They are a mix of fold over and press release connectors. The one near the front actually stays together, chase the wires to where they connect to the door. You will find a few velcro strips holding wires down. Unplug from the door itself.
First picture is the water shield. The white thing...

Next is the attachment for the door latch. Don't forget to put this back in the connector when you put the door back together... Not that I did that or anything.

Here is one of the couple slide connectors. These have a lever on the top with a stop. Push the stop in and slide the lever, the connector comes apart very easy. The other connectors are standard pressure connectors with a small latch. Make sure that when you put it all back together that the stop is in.
Sticky stuff. Get it ALL off. Takes a while but it will come off

Tape your window up. It *WILL* fall if you don't. (and probably shatter)
Here is the right hand side of the regulator. The old one is underneath in the door. Just to give you an idea of how it sits in the car. Notice that the motor has a bolt on it (rubber mount).
Here is the left side.
This is the left side window bolt. This needs a 10mm wiggle socket as it is at a slight angle.
Right hand side, nothing special. Just a 10mm bolt.
Here is the connector for the motor. It is just behind this portion of an interior water shield. Disconnect without removing the shield, just be careful.
So as for instructions, it is a straight forward job. There are 7 bolts/nuts to undo. Two on the left support, One on the left window connector. Then two on the right support, one on the motor and one on the right window connector. Undo all of them and your window should stay exactly where it was if you did everything right.
The regulator will come out of the bottom hole, just give it a few minutes of fiddling. Be VERY careful about the interior water shield. You can do this without damaging it.
Then slide the new regulator up and in. All of it goes in, the left hand side has two bolts on the unit right out of the box. Leave them on. Push it up and into the openings and back down (it will be obvious when you see it.) Then do the same on the right side. Make sure the galvanized metal window connectors are on the inside of the window connectors. Bolt it all down and viola. Done.
It is VERY fiddly to get it in, but it does work.
Then put everything else back together, though I would plug the two middle connectors into the door panel and turn on the car to make sure all of the electronics are working.


")


