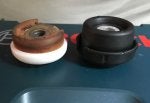
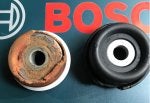
I replaced the hyperblock/top shock bushings today. A straight forward and easy procedure that shops apparently charge 6 hours per side according to the threads I've read here. The replacement piece is different from the original. It's a single black rubber-like piece that replaces the plastic cradle and red/tannish hockey puck-like bushing. They were around $50 each on Ricambi. Hopefully this design will last longer.
First - review the workshop manual. You don't really need the manual to do the repair, but it is as simple as it looks. I was able do the repair with a single jack; however, I can see depending on how the refitting goes that for some might require a second jack to compress the shock upward when refitting it. Long handle wrenches worked best and you'll also need them in larger sizes 22mm, 19mm, and 18mm wrench -- in addition to large sized sockets.
The first bushing took 2.5 hours -- primarily because the FD sport coilovers has an additional side tube and didn't fit in my homemade strut compressor (two truck brake rotors held together with long 20 inch threaded bolds). Cheap Harbor freight spring compressor clamps would probably have worked, but I threw those out years ago. My high end strut compressor clamps were too bulky to fit. After 30 minutes figuring out an alternative method, I used two ratcheting straps to hold the spring while replacing the hyperblock. There are numerous youtube videos that will show you how to do this. The second bushing took a little over an hour.
Helpful tips:
1) Use a sharpie to mark the position of the top and bottom of the spring in relationship to part
#9 and
#19 in the diagram above. It is a pain aligning the four top hex screws back to the body if you don't do this.
2) When refitting the four top hex screws, I found it easier to first screw them in from the engine bay downward through part
#19 to align the holes and then remove each screw individually and refit in the proper place.
3) Remember to torque the shock nuts in the engine bay once the car is off the jack/lift. I kept the same number of nut turns on the original setup, but found I has to torque them down 5-6 more threads downward.


")


