Maserati Forum banner
1 - 20 of 32 Posts

ltmax

· Registered
Joined
·
103 Posts
Discussion starter · #1 · (Edited)
Pulled off the front bumper on my 2012 a few days ago to get it repainted and thought I'd share some observations/lessons learned.

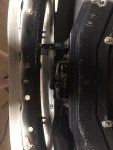
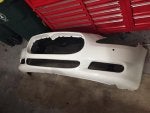
The removal process is pretty straightforward but much more involved than most other cars I've worked on. Lots of fasteners to remove (picture below shows all fasteners on the drivers side alone) and not too many plastic clips like most newer vehicles these days so I'm once again very impressed with the build quality. It's also surprising just how much heavier duty (thicker) the bumper cover is compared to what most cars are made of. Here's a quick rundown of removal. Since you have to disconnect TPMS and headlights to remove, I think it's probably best to disconnect the battery so that's what I always do beforehand.

1. Remove large engine cover, rubber seal between hood and front bumper and all fasteners underneath.
2. Remove the four nuts holding the bumper cover to inner corners of fenders that are exposed once you remove the seal in step 1.
3. Remove underside splash shield, front wheels and inner fender liners.
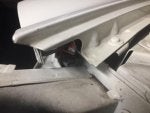
4. Remove large metal brackets between front fender openings and bumper cover on each side (unplug tpms sensors before removing once bolts are out).
5. Slide blue clips back and unplug wiper washer hoses from bottom of headlights.
6. Remove headlight adjustment cables from plastic holding clips.
7. Lower wiper washer fluid tank from left side inner fender so you can remove headlight.
8. Unplug and remove right headlight
9. Unplug and slide back left headlight or remove more brackets to completely remove.
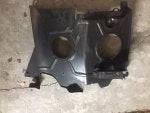
10 Remove 8 bolts holding fender to outer edges of bumper cover now visible after moving headlights.
11. Remove two bolts holding large center support to bottom center of bumper cover
12. Remove two bolts holding top center of bumper cover/inner grille support to center support above grille opening.
13. Bumper should now be able to slide off but as you start removing bumper you need to unplug wiring harness connector from behind upper right corner of grille.

The grille can come off the bumper while it's on the car but the four fasteners holding it to the bumper cover are more easily accessed once bumper is off. Once you remove the four fasteners along the inner top edge, there are six plastic clips around the sides and lower part of the grille that snap into the bumper cover. 4 of the 6 of mine were snapped off sometime in the past when it suffered a minor front end bump. These clips are very small and easily broken so be very gentle as you try to slide the grille out of the bumper cover.

 
Discussion starter · #4 ·
That's a great question, my gut told me that I should bring the fuel filler door with me to the paint shop so they could custom color match the paint just in case the Bianco Eldorado PPG paint code wasn't exactly perfect but since there was only two shades of this color used over 15 years and it's spent most of it's life indoors they said it should be fine..... needless to say the color turned out way way off so it's getting redone Monday.

I kinda feel bad for my painter who has to redo all his work but since it wasn't his fault, I'll be sure to make it up to him.

On the positive side I was planning on replacing the leaking cam cover gaskets anyway so now I've got a good excuse to get it done this week while the bumper is off and it's not going anywhere.

 
Also note that PPG give exact instructions for pre-painting underneath work for every color.

i.e. some colors need grey material underneath some other colors need lighter material. It also states if it needs 2 or 3 hand spraying , the correct distance etc.

Also the paint shop has to follow exact the mix of colors in order to produce the correct one. One more wrong drop is enough to ruin the result.

In reality many painters does not follow the rules. They do the job by experience most of the times because they know better than PPG and every PPG ??
You see a nice perfect glossy bumper at the shop . Perfect work but when you bring it next to car the difference is awful.

I hope you have 100% match next time. Let us know the result.
 
The paint shop is much more important than the painter.

If it produced the wrong color the painter cannot do anything.....

Almost all paint shops has color-analyzer units. You can give them the gas cap and the unit can produce the color. But remember: there is always a margin of error.
 
Discussion starter · #7 ·
You can bet they will be color matching this time, personally taking the fuel door to the paint shop Monday since the manager is a friend of mine I'm sure he'll get it sorted out. Single stage white is pretty forgiving unlike the tri-coats and metallics so hopefully it's an easy fix. Will post some pictures in a few days once it's resprayed. Wish me luck.
 
Environmental control of the paint bay is also a factor. Too high or too low humidity changes the paint spray droplets. Too high temp starts drying the paint before it hits the car panel. These factors can change things even after a perfect match with a known sample panel. I also think it takes a master painter to get just the correct amount of application to achieve the very subtle, very slight orange peel effect in the paint to make its highlights sparkle in the sunlight. If you have painters like this, keep them in business!
 
Painting to a high standard is an art - not a trade. I agree completely with KISSTHEBRCKSDAD....really good painters need to be compensated. Years ago I had a ZR-1 Corvette that needed the right-front corner of the hood repaired and touched up, but the color of the car was medium quasar blue metallic, and nobody would touch it. Well word of mouth eventually reached me regarding a painter in a small town about an hour away - so I drove to his shop to take a look. The building was nothing special...but there were a few very high end cars there...a good sign. He said he could match the paint and metallic, but it would take about 2 weeks, as he would need to do some test panels, etc. I called him after about 10 days and he said for me NOT to come see the car as I would be traumatized by it's appearance. He had repaired the hood and the car was setting in the sun, to speed up the expected shrinkage to the repair, he will continue work on it until it's perfect. He had to sand the whole front half of the car back into the doors, in preparation for painting and blending. He had painted several test panels, finally getting the right mixture on the 4th try. Well after 3 weeks I nervously went to pick up the car. I walked in and was amazed...the car looked perfect under the lights. I backed the car out into the sun, looked at it from every angle...and could not see any evidence of repairs. Event the orange peel texture was spot-on. I was just astonished. The total cost was $1,300 but I have him $1,600. He asked why, and I said..."because you have exceeded my expectations, the car looks awesome". I absolutely could not tell there was ever any work done.
 
Discussion starter · #11 · (Edited)
Well I replaced the right cam cover gasket today while I let the bumper bake in the sun all day. Will reinstall the bumper tomorrow and see how it looks. My friend who painted it specializes in fixing/blending minor damage on new Mercedes, BMW, and other European cars so he's really talented and has been at it for a long time. He's pretty sure the color match is good but if it's off we'll just have to keep at it until it's perfect. I actually took the entire hood off and brought it to the paint supply place so they could match it perfectly. The cam cover gasket was a much easier job than I had expected and only took 2 hours from start to finish and it was very comforting to see the new style variator with the large spring visible on the front so hopefully it won't ever suffer variator issues. It will be nice to not have that tiny oil leak dripping onto the catalytic converter anymore...

 
Discussion starter · #12 ·
Got the car all finished and back together last weekend. After 3 attempts to perfectly match the front bumper with no success it's as close as it's going to get (for now). Most people probably wouldn't notice the color difference between the front bumper and the rest of the car but it's definitely a little off. Guess I'll drive it for a while and see if it bothers me down the road, and if it does I'll get it redone again. It's a big improvement from the scrapes and damaged clear-coat that was on it so overall I'm satisfied with the results.

 
Being different material is an all time classic excuse.
I have tired to hear this excuse from the painters.

When it comes out of the factory why it has exactly the same color?

The most important thing is the coating below before start applying the paint.

If the painter does a good job it doesn't matter if it is plastic or metal or whatever.
 
Lots of good info about paint in this discussion (y)
Had my front bumper sprayed on my 2014 GT, Grigio Alfieri. Thing was spot on and looked like it was never removed. With all the different shades of gray i was amazed at the color match. Jim Ellis Maserati body shop did a 'bang up' job.
 
Regarding an exact bumper-to-body color match, of the last 3 new cars we've purchased, only one of them matched exactly. I know there are exact color matches out there, I just think they are outnumbered by the mis-matches. It would be great if a paint expert would chime in on this subject.
 
Regarding an exact bumper-to-body color match, of the last 3 new cars we've purchased, only one of them matched exactly. I know there are exact color matches out there, I just think they are outnumbered by the mis-matches. It would be great if a paint expert would chime in on this subject.
New cars with zero miles are not exempt from damage. In fact, they are damaged quite often during transport and or mishaps at the dealership. Dealerships knowingly replace and repair new cars more than you think. I once had a neighbor who owned a new car dealership. On more than one occasion he has told me of brand new cars being damaged at dealerships then repaired/painted and sold as new cars, without any damage being documented. Egregious i know, but it does happen.
 
I'm about to get my front bumper removed and repainted, Blue Sebring, on my 2005 QP with original paint all around. This is an insurance claim due to some damage which occurred while the car was in custody of my service shop. $2560 is the approved estimate for the work... complete R&R plus paintwork. I will update with results. Photos of the damage are attached.
130338
130339
130340
 
1 - 20 of 32 Posts